Introduction
The Kubernetes Security Testing Guide (KSTG) aims to be a comprehensive testing guide for Kubernetes cluster security assessment that covers a top down approach to assess the security of a cluster. The guide include methodology, tools, techniques and procedures (TTP) to execute an assessment that enables a tester to deliver consistent and complete results.
While developed primarily for security testers, it can help DevSecOps Teams understand attacker Tactics, Techniques and Procedures (TTP) and design effective countermeasures.
Reference
- https://owasp.org/www-project-kubernetes-security-testing-guide/
Kubernetes Introduction
Why Kubernetes
A lot of developers have moved or are moving from a traditional world to a container based ecosystem. This allows developers to package their application code, dependencies and required libraries in a simple container and use it anywhere wherever there is a container runtime available.
An example of a container runtime is Docker
At a minimum, Kubernetes can schedule and run application containers on clusters of physical or virtual machines. However, Kubernetes also allows developers to ‘cut the cord’ to physical and virtual machines, moving from a host-centric infrastructure to a container-centric infrastructure.
This approach provides the full advantages and benefits inherent to containers. Kubernetes provides the infrastructure to build a truly container centric development environment. This is the primary reason developers love it.
What is Kubernetes
With Kubernetes, you are able to quickly and efficiently respond to customer demand
- Deploy your applications quickly and predictably
- Scale your applications on the fly
- Roll out new features seamlessly
- Limit hardware usage to required resources only
- Our goal is to foster an ecosystem of components and tools that relieve the burden of running applications in public and private clouds
According to Brian Grant Kubernetes is an open-source platform designed to automate deploying, scaling, and operating application containers.
Kubernetes is
- Portable: public, private, hybrid, multi-cloud
- Extensible: modular, pluggable, hookable, composable
- Self-healing: auto-placement, auto-restart, auto-replication, auto-scaling
Google started the Kubernetes project in 2014. Kubernetes builds upon a decade and a half of experience that Google has with running production workloads at scale, combined with best-of-breed ideas and practices from the community.
Additional references for further reading
- https://aucouranton.com/2014/06/13/linux-containers-parallels-lxc-openvz-docker-and-more/
- https://kubernetes.io/docs/concepts/overview/what-is-kubernetes/
The Children's Illustrated Guide to Kubernetes

source: https://www.youtube.com/watch?v=4ht22ReBjno
High level overview of common resources
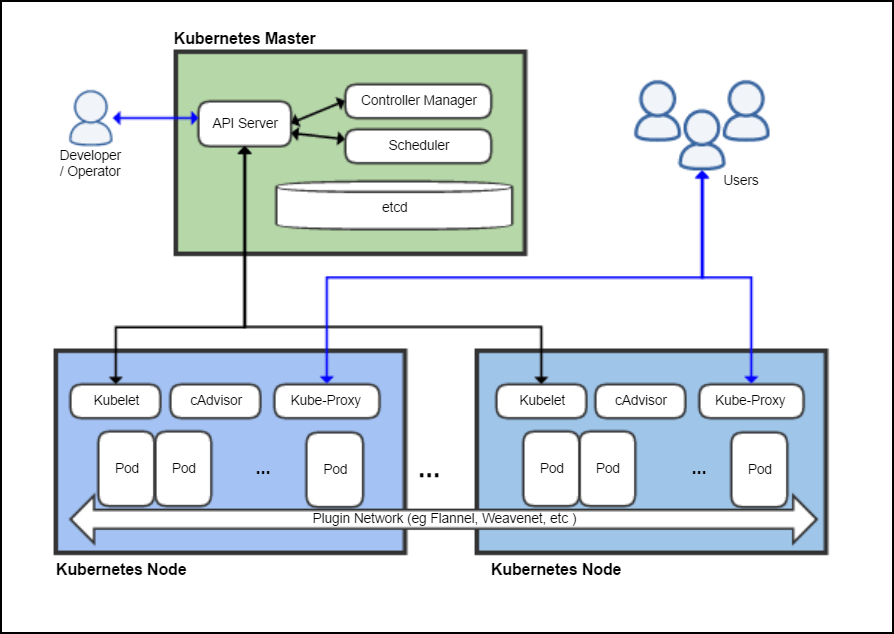
Image source: Khtan66 CC BY-SA 4.0, from Wikimedia Commons
- To work with Kubernetes, you use Kubernetes API objects to describe your cluster’s desired state
- You set your desired state by creating objects using the Kubernetes API, typically via the command-line interface,
kubectl - You can also use the Kubernetes API directly to interact with the cluster and set or modify your desired state
- Kubernetes Control Plane works to make the cluster’s current state match the desired state
- Kubernetes performs a variety of tasks automatically
- such as starting or restarting containers
- scaling the number of replicas of a given application
- and a lot more
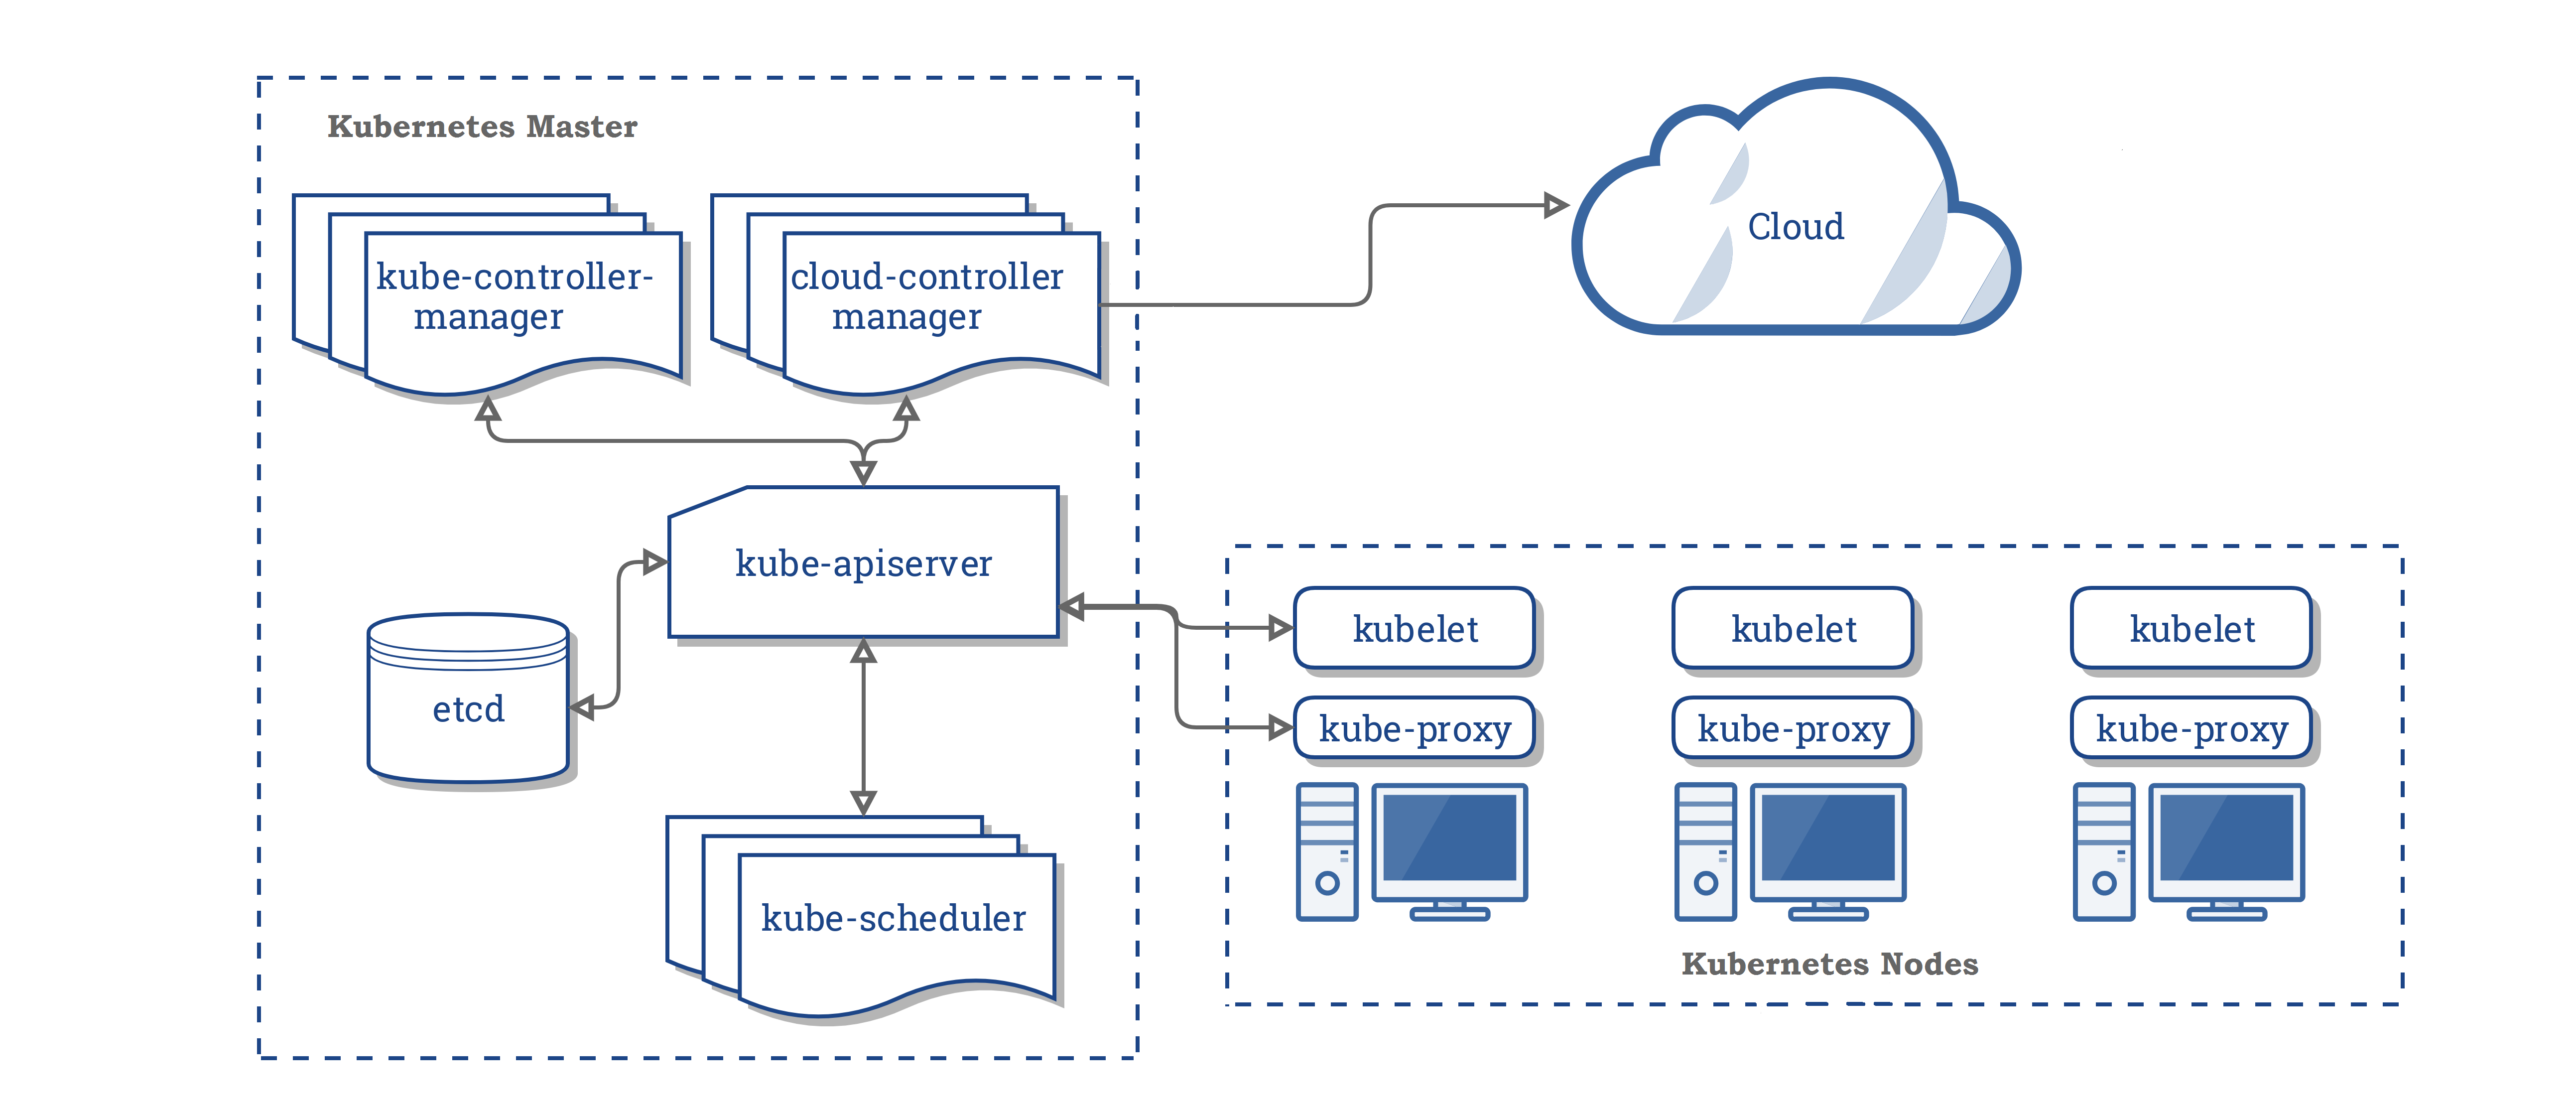
Kubernetes Master
The Kubernetes Master is a collection of three processes that run on a single node in your cluster, which is designated as the master node. Those processes are
Kubernetes Node
Each individual non-master node in your cluster runs two processes:
- kubelet, which communicates with the Kubernetes Master
- kube-proxy, a network proxy which reflects Kubernetes networking services on each node
Kubernetes Objects
Kubernetes contains a number of abstractions that represent the state of your system. These abstractions are represented by objects in the Kubernetes API; see the Kubernetes Objects overview for more details.
Basic Objects
The basic Kubernetes objects include:
Higher Level Abstractions
In addition, Kubernetes contains a number of higher-level abstractions called Controllers. Controllers build upon the basic objects, and provide additional functionality and convenience features. They include
Creating a Kubernetes playground with Katacoda
We will get started by following the Kubernetes Basics from the official documentation which is hosted at Kubernetes.io
This tutorial provides a walk through of the basics of the Kubernetes cluster orchestration system.
Each module contains some background information on major Kubernetes features and concepts and includes an interactive online tutorial. This is great for practicing the basics. Did we mention that this is available to all without any charges so you can practice it whenever you feel like it?
These interactive tutorials let you manage a simple cluster and its containerized applications for yourself.
Creating a Cluster
Deploying an App
Exploring Your App
Exposing Your App
Scaling Your App
Updating Your App
Hands-on common use-cases
Getting started with kubectl CLI
kubectl is a command line interface for running commands against Kubernetes clusters. kubectl is pronounced as cube c t l. Watch this talk for The definitive pronunciation guide :)
- Getting the kubernetes cluster information
kubectl cluster-info

- Get information from nodes, pods, svc(services), ing(ingress), ns(namespace), deploy(deployments)
kubectl get nodes
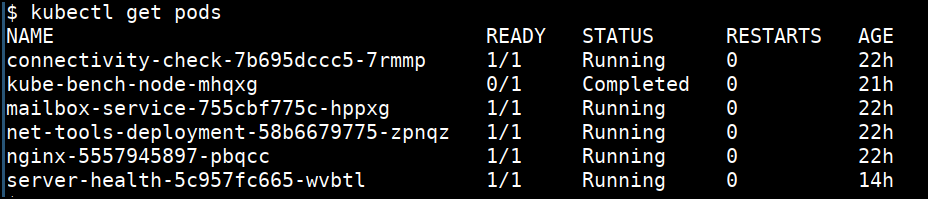
kubectl get pods
kubectl get services
Bunch of these commands can use shortcuts. For example the rest of the commands are using their shortcuts.
kubectl get svc
kubectl get ing
kubectl get ns
kubectl get deploy
- Getting more information
kubectl get nodes -o wide
kubectl get pods -o wide
kubectl get svc -o wide
kubectl get deploy -o wide

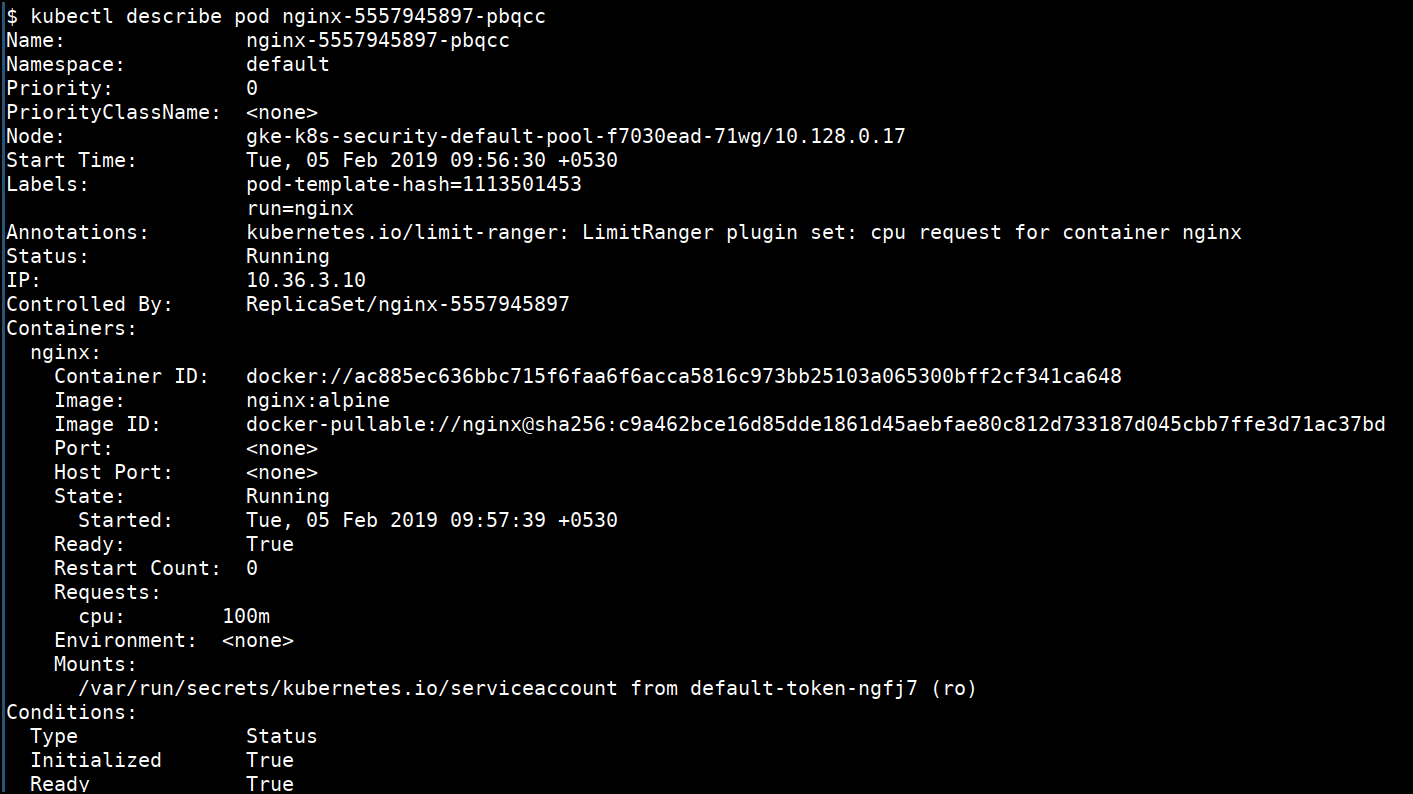
- Getting detailed information
kubectl describe node <NODENAME>
kubectl describe pod <PODNAME>
kubectl describe svc <SVCNAME>
kubectl describe ing <SVCNAME>
kubectl describe ns <SVCNAME>
kubectl describe deploy <DEPLOYNAME>
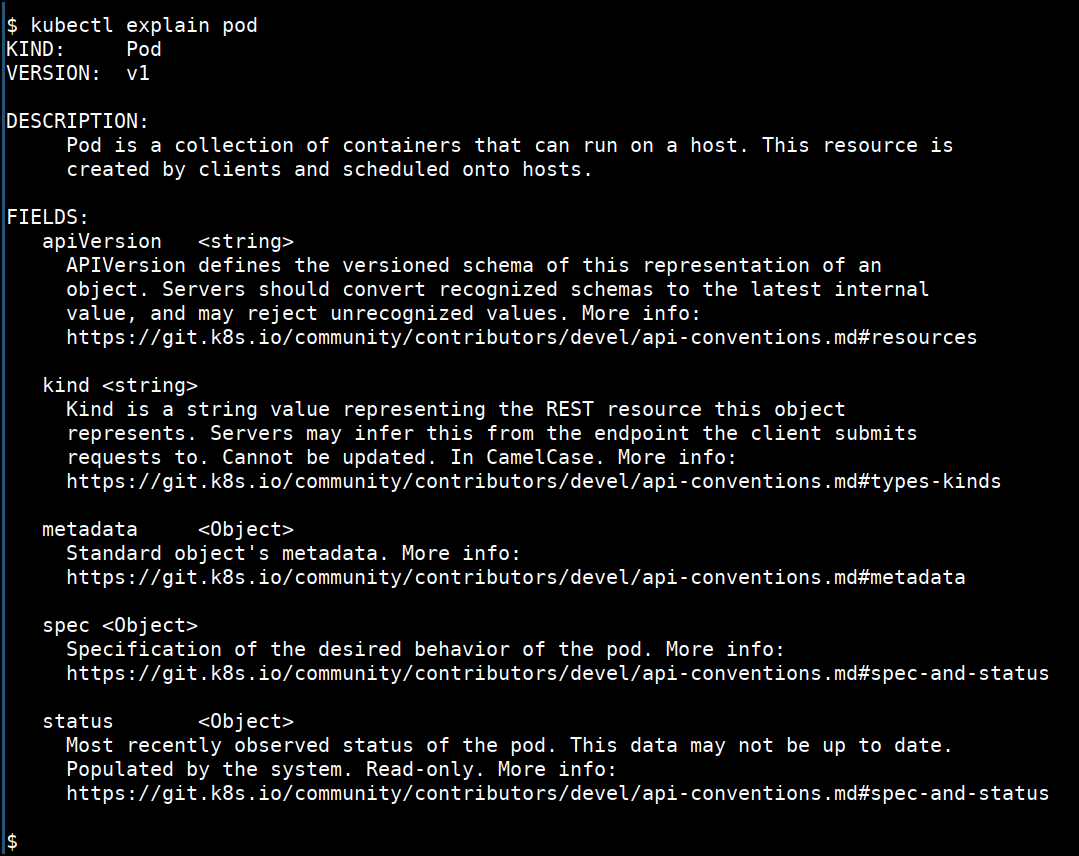
- Detailed help for the sub command
kubectl explain pod
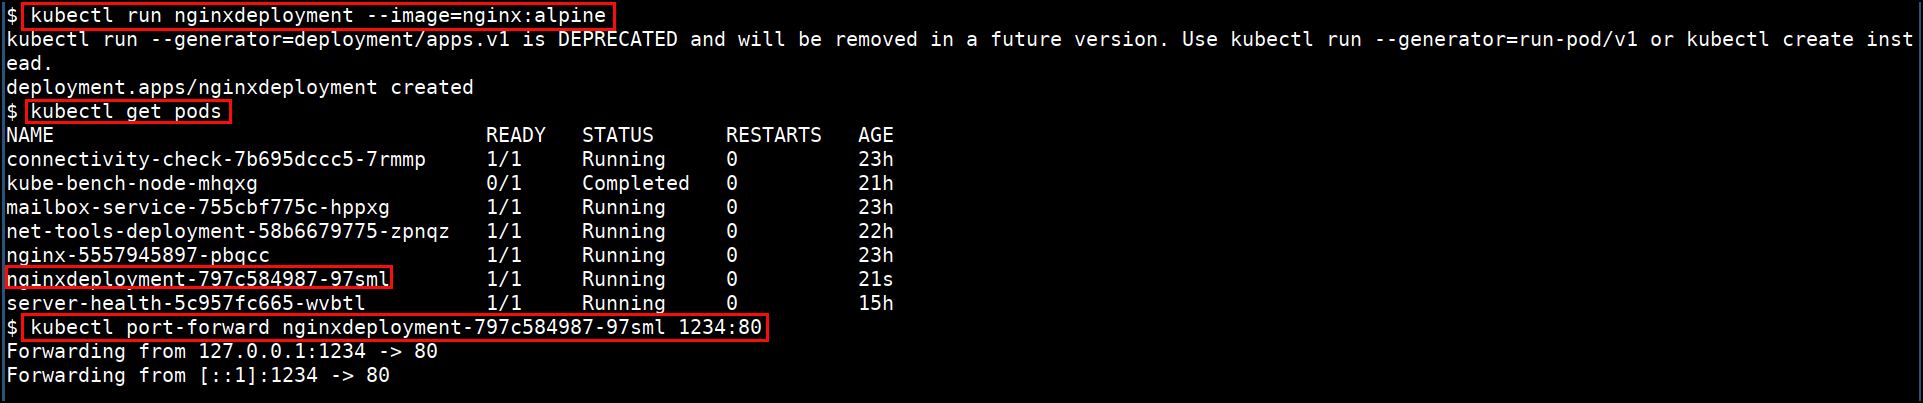
- Creating deployment using command line
kubectl run nginxdeployment --image=nginx:alpine
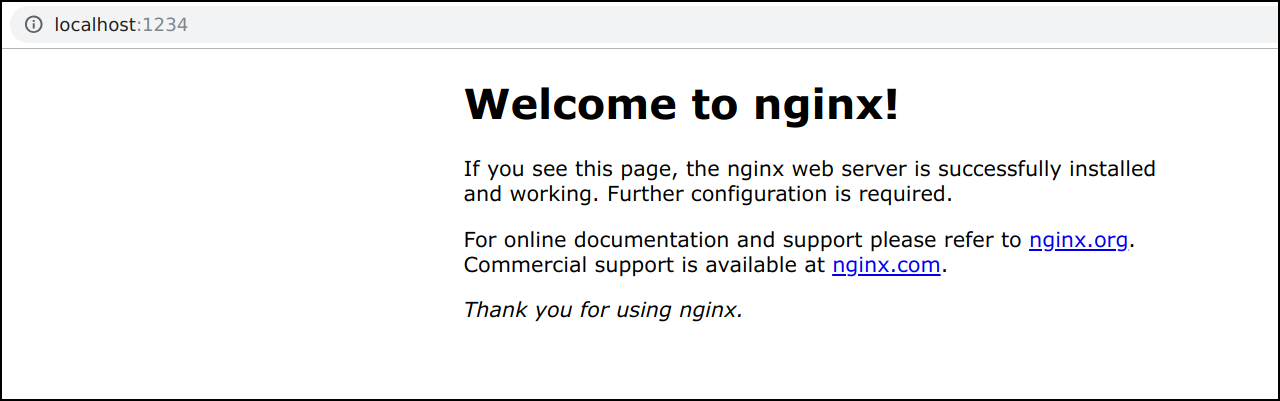
- Port forward the pod to local system
kubectl port-forward <PODNAME> 1234:80
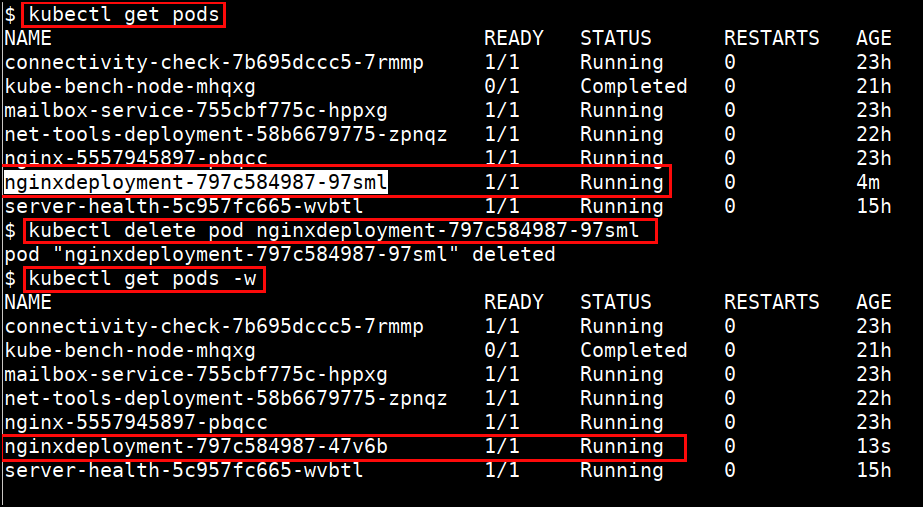
- Deleting pod
kubectl delete pod <PODNAME>
kubectl delete deploy <DEPLOYNAME>
kubectl delete svc <SVCNAME>
kubectl delete ing <INGNAME>
kubectl delete ns <NSNAME>
- Shell into the pod
kubectl exec -it <PODNAME> sh

- Looking for logs (stdout & stderr)
kubectl logs <PODNAME>
kubectl logs -f <PODNAME>

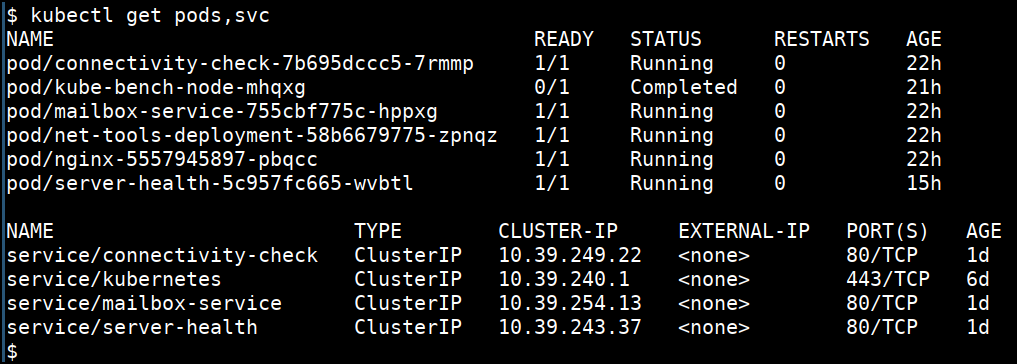
- Combining multiple commands
kubectl get pods,svc
- Specifying with different namepsace
kubectl get pods -n database

- Listing the API resources avialble
kubectl api-resources
- Checking for the permission to do
kubectl auth can-i create pods

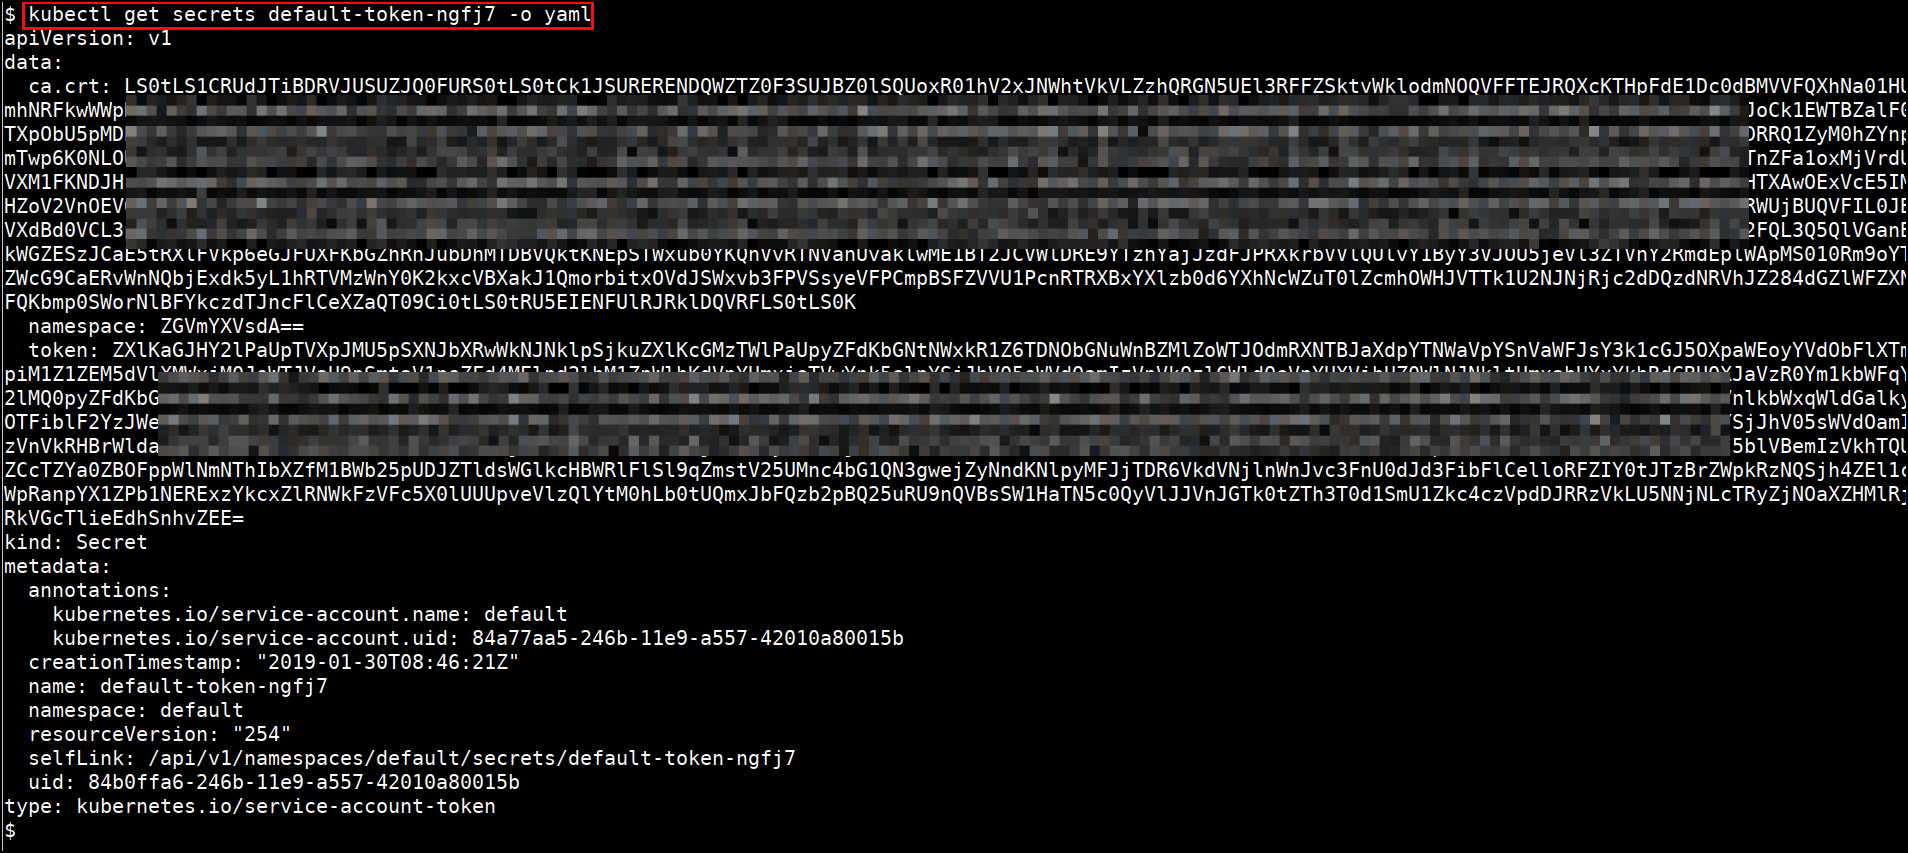
- Getting output in YAML format
kubectl get secrets <SECRETNAME> -o yaml
References
Deploying simple application in Kubernetes Cluster using YAML
- To create a basic nginx deployment with 2 replicas, save this file as
nginx-deployment.yamlusing your text editor
apiVersion: apps/v1
kind: Deployment
metadata:
  name: nginx-deployment
spec:
  selector:
    matchLabels:
      app: nginx
  replicas: 2
  template:
    metadata:
      labels:
        app: nginx
    spec:
      containers:
      - name: nginx
        image: nginx:1.7.9
        ports:
        - containerPort: 80
- Run the apply command to perform the changes in cluster
kubectl apply -f nginx-deployment.yaml
- Get the pods related to this deployment
kubectl get pods --selector app=nginx

- Update the deployment file with
replicasto 3 innginx-deployment.yamlusing your text editor
...
  replicas: 3
...
- Apply the changes
kubectl apply -f nginx-deployment.yaml
kubectl get pods --selector app=nginx

- Expose a service within the cluster
- Create a file
nginx-service.ymlwith the following content
apiVersion: v1
kind: Service
metadata:
  name: nginx-deployment
spec:
  ports:
  - port: 80
    protocol: TCP
    targetPort: 80
  selector:
    app: nginx
  type: ClusterIP
- Create the service in the cluster
kubectl apply -f nginx-service.yml
- Start a
port-fowardto access in-cluster service
kubectl port-forward svc/nginx-deployment 8888:80
- From another terminal, access the service through the port forward
curl http://localhost:8888/
- Delete the deployment
kubectl delete -f nginx-deployment.yaml
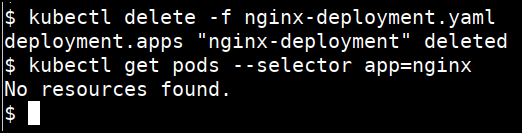
- Delete the service
kubectl delete -f nginx-service.yml
References
Threat Modelling
Threat modelling works to identify, communicate, and understand threats and mitigations within the context of protecting something of value.
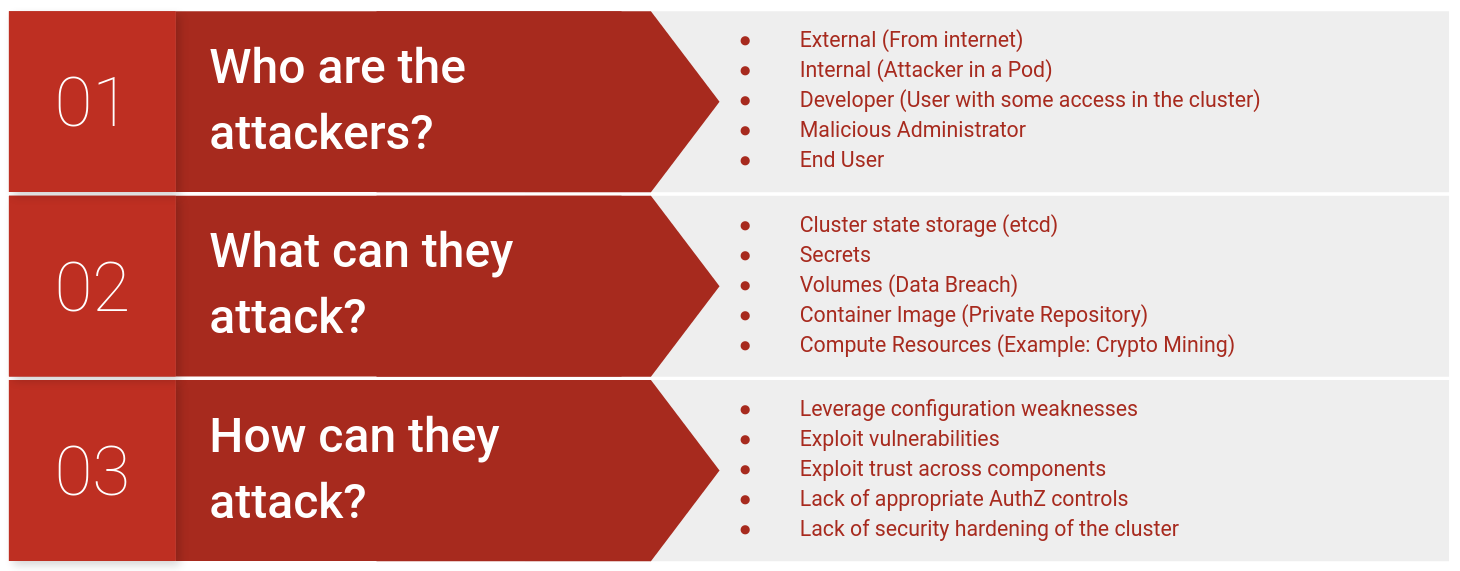
Kubernetes is a complex, distributed system with multiple components. In order to perform an effective security testing, it is important to understand how different components interacts with each other and answer questions such as
- Who are the attackers?
- What can they attack?
- How can they attack?
We will present a high-level threat model in this document, which in turn will drive the different chapters in this document. The objective is to allow a tester to chose what is applicable and what is not based on the threat model and the level of access available to the tester.
A simple threat model is presented below as an example. The intention is to get testers started with thinking in terms of a threat model. The threat model is further expanded in subsequent chapters.
A detailed threat model is already developed as part of a security audit conducted by Trail of Bits along with Kubernetes Security Audit Working Group. We refer to this threat model as required to conduct an effective security testing of a Kubernetes cluster.
References
- https://github.com/kubernetes/community/tree/master/wg-security-audit
- https://owasp.org/www-community/Application_Threat_Modeling
- https://infosec.mozilla.org/guidelines/risk/rapid_risk_assessment.html
Terminology
TBD - Use OWASP Threat Modeling terminology.
Threat Actors
| Actor | Description |
|---|---|
| External Attacker | An attacker who is external to the cluster and is unauthenticated |
| Internal Attacker | An attacker who has some access in the cluster, such as an attacker with container access (Attacker in a Pod) |
| Malicious Internal User | A user, such as administrator or developer, who uses their privileged position maliciously against the system, or stolen credentials used for the same. |
| Administrator | An actual administrator of the system, tasked with operating and maintaining the cluster as a whole |
| Developer | An application developer, who is deploying application to a cluster, either directly or through another user such as administrator |
| End User | An external user of an application hosted by a cluster |
We will primarily focus on two type of threat actors in Kubernetes Security Testing Guide (KSTG), however we will refer to other threat actors as required.
- External Attacker
- Internal Attacker (Attacker in a Pod)
Reference
- https://github.com/kubernetes/community/blob/master/wg-security-audit/
Trust Boundaries
Trust Boundary or Zone segregates different components in a Data Flow Diagram based on sensitivity and level of access to critical assets in the system. The Kubernetes Threat Model by Security Audit Working Group defines the following trust boundaries which we will refer in the testing methodology
| Zone | Description |
|---|---|
| Internet | The externally facing, wider internet zone |
| API Server | The master component, usually exposed to cluster users, needed for interaction with kubectl |
| Master Components | Internal components of the master node that works via. callbacks and subscriptions to the API Server |
| Master Data | The master data layer that stores the cluster state. Example: etcd |
| Worker | The worker components that is required to add a node in the cluster and to run containers |
| Container | The containers being orchestrated by the cluster |
System Architecture
The diagram below gives the high-level system architecture of Kubernetes
kube-apiserver
TBD
kube-controller-manager
TBD
kube-scheduler
TBD
etcd
TBD
kubelet
TBD
kube-proxy
TBD
Other
Container Network Interface (CNI)
TBD
Container Runtime Interface (CRI)
TBD
Using the Threat Model
A simplistic and reduced threat model is provided in this guide. The purpose is to enable a tester to determine which all tests are relevant depending of the context and scope of testing. For example, a Blackbox Assessment where no credential is available to the tester will not include any tests that require container level access in the cluster till valid credentials are obtained or provided.
Following points must be consider while using a test case provided in this document
- Each test case will be labelled with attacker position
- Each test case will be labelled with trust boundary that the test affects or breaches
- Tester must consider test cases based on level of access and attacker position label
- Tester must consider test cases based on scope of testing and trust boundary label
For example, given a test where
- No cluster access is provided
Any test that is labelled as External Attacker will be feasible for the tester.
Kubernetes Security Testing
Discovery
The discovery section cover various techniques and procedures for discovering various components of a Kubernetes cluster. This primarily involves
- Ability to discover master node(s)
- Ability to discover worker node(s)
Network Discovery
Common ports for master node discovery
| Port | Protocol | Service |
|---|---|---|
| 443, 6443, 8443 | TCP | Kubernetes API Server (kube-apiserver) |
| 8080 | TCP | Kubernetes API Server insecure port (Listens on localhost only) |
| 2379, 2380 | TCP | etcd server |
Common ports for worker node discovery
| Port | Protocol | Service |
|---|---|---|
| 10250 | TCP | Kubelet |
| 10255 | TCP | Kubelet read-only port |
| 30000-32767 | TCP | nodePort service port range (default) |
Given the above network services information, Kubernetes master or worker nodes can be discovered by scanning a network CIDR for ports, for example:
To discover master nodes
nmap -Pn -sS -sV -p 443,6443,8443,8080,2379,2380 $CIDR
To discover worker nodes
nmap -Pn -sS -sV -p 10250,10255 $CIDR
To discover nodePort exposed services
nmap -Pn -sS -sV -p 30000-32767 $CIDR
Fingerprinting Master Node
The Kubernetes kube-apiserver exposes a REST API interface for cluster administrators to manage the cluster. This API server has distinct fingerprint, available to an unauthenticated user using which it is possible to fingerprint an API server.
Version Endpoint
| Threat Model Attribute | Value |
|---|---|
| Attacker Position | External |
| Threat | Information Disclosure |
The Kubernetes API server exposes a version endpoint to unauthenticated user using which it is possible to fingerprint the version of Kubernetes API server.
curl -sk https://$API_HOST:$API_PORT/version
Produces output (example)
{
  "major": "1",
  "minor": "18",
  "gitVersion": "v1.18.2",
  "gitCommit": "52c56ce7a8272c798dbc29846288d7cd9fbae032",
  "gitTreeState": "clean",
  "buildDate": "2020-04-30T20:19:45Z",
  "goVersion": "go1.13.9",
  "compiler": "gc",
  "platform": "linux/amd64"
}
A security tester can infer that the target is running kube-apiserver version v1.18.2 based on the above JSON response from the API server.
Fingerprinting Worker Node
Discovery
The discovery section cover various techniques and procedures for discovering various components of a Kubernetes cluster. This primarily involves
- Ability to discover master node(s)
- Ability to discover worker node(s)
Network Discovery
Common ports for master node discovery
| Port | Protocol | Service |
|---|---|---|
| 443, 6443, 8443 | TCP | Kubernetes API Server (kube-apiserver) |
| 8080 | TCP | Kubernetes API Server insecure port (Listens on localhost only) |
| 2379, 2380 | TCP | etcd server |
Common ports for worker node discovery
| Port | Protocol | Service |
|---|---|---|
| 10250 | TCP | Kubelet |
| 10255 | TCP | Kubelet read-only port |
| 30000-32767 | TCP | nodePort service port range (default) |
Given the above network services information, Kubernetes master or worker nodes can be discovered by scanning a network CIDR for ports, for example:
To discover master nodes
nmap -Pn -sS -sV -p 443,6443,8443,8080,2379,2380 $CIDR
To discover worker nodes
nmap -Pn -sS -sV -p 10250,10255 $CIDR
To discover nodePort exposed services
nmap -Pn -sS -sV -p 30000-32767 $CIDR